Sunday, 22 December 2013

Rocky Road Brownies

Rocky Road, who loves rocky road? Its that crunch of the peanuts, the juicy squeeze of the red raspberry lollies and the melting chocolate all mixed into one. Now just add a chocolate brownie and you're in heaven. This is a recipe I found a long time ago and then lost it, but the idea was still there, so I made my own up.

The best part of rocky road is you can make it simple or extravagant as you want. In the recipe below, I will so you the extravagant side of rocky. This is also a really good recipe for Christmas gifts. 


The great thing about this recipe also, it doesn't take all day in the kitchen to have a final product. You can do the cooking in the morning and be enjoying the rocky for after Christmas lunch.

Here in Australia it is normally hot (I say normally because at this very moment in time, it is raining and cold) so having roasts is not the best option some times. Slaving away in a hot kitchen when it can be 40 plus degrees outside is not good. After these are refrigerated, it is a nice cool, and very tasty treat on a hot summers day.

What you need:
75g plain flour
30g cocoa powder
155g caster sugar
2 eggs
125g melted butter
150g of mini marshmallows
100g pistachio nuts (husks removed)
100g glace cherries
25g shredded coconut 
200g milk chocolate
100g dark chocolate

How to:
1) Preheat oven to 180 degrees C. Brush a 20 x 30cm (approx) baking tin with some of the melted butter. Line the tray with baking paper with the sides overhanging. 

2) Sift the flour and cocoa powder into a large bowl. Stir in the sugar. Make a well in the centre and add the eggs and melted butter. Stir to combine. 

3) Pour the mixture into the baking tin and bake for 20 minutes. Set aside in the pan and allow to cool. Keep the brownie in the pan, do not remove.

4) Combine the marshmallows, cherries, pistachios and coconut in a bowl. Melt the chocolate and add to the mixture. Stir to combine.

5) Pour the chocolate mixture over the brownie and spread the mixture over out evenly. Place in the fridge until the chocolate has set. Once the mixture has set, slice anyway you want and enjoy.


Ben's Food Blog is moving up in the World and now has QR Codes. Don't forget to go to the Facebook page and like Ben's Food Blog. You can also follow us on Instagram - photos come out on Instagram before they are put on the blog as recipes.


Instagram - @bensfoodblog


MERRY CHRISTMAS


Sunday, 15 December 2013

Baklava (Baklawa)

I have always enjoyed the sweet and sticky taste of Baklava. The crunch of the pastry and nuts just brings a smile to my face. For me, when I think of Baklava, I always think Greece. I was chatting to a work colleague who is from Lebanon and he told me that they have their own style Baklava. Of course, me loving Middle Eastern food and Baklava, couldn't believe my ears.

With the Greek style Baklava, you have spices such as cinnamon and cloves. With the Middle Eastern version, you have things like rose water and orange blossom. Having one of these Baklava after a hearty Tagine just hits the spot, just like an after dinner mint.


Like the Turkish Delight I made for one of my first recipes, this is very sticky, but so much more easy to handle than the Turkish Delight. There is two components to this recipe; the sugar syrup and the Baklava. The best way to do this is to start the Baklava and when it is in the oven, start the sugar syrup.

BAKLAVA

What you need:
1 x 375g packet filo pastry
180g of butter, melted
1 cup of crushed peanuts
1 quantity of sugar syrup HOT (see below)
1/4 cup coarsely ground pistachio nuts

How to:
1) Preheat the oven to 220 degrees C. Cut the filo pastry sheets to the size of your baking tin. Brush the baking tin liberally with melted butter.

2) Layer half the filo pastry sheets in the tin, brushing every second sheet with butter.

3) Spread the peanuts evenly over the pastry.

4) Cover with the remaining filo pastry, again brushing every second sheet with butter. Do not brush the top layer, not yet.

5) With a sharp knife, cut the Baklava into diamonds. Now brush the top with the melted butter.

6) Bake for 10 minutes, then reduce the heat to 180 degrees C and bake for a further 30 minutes or until golden brown. This is the best time to start the sugar syrup.

7) Remove from the oven and pour over the hot sugar syrup. You may hear a sizzling sound - this is normal.

8) Sprinkle the pistachio nuts over the top and allow to cool, then serve.

SUGAR SYRUP

What you need:
400g white sugar
1 tbs lemon juice
1 tbs of either rose water or orange blossom
1 1/2 cups of water

How to:
1) Bring the sugar, lemon juice and water to the boil over medium heat.

2) Cover and let boil for about 20 minutes or until the sugar has dissolved and the syrup is thick.

3) Stir in the rose water or orange blossom and remove from the heat.


Don't forget that Ben's Food Blog is on Facebook and Instagram.


Instagram - @bensfoodblog 

You can also share this blog right to your Facebook page to share with all your friends. There is a Facebook share button on the top right hand corner of the navigation pane, so please like and share this page to get it out there :) thank you for your support.


Saturday, 26 October 2013

Rúgbrauð - Icelandic Rye Bread

I have got great plans to head to this amazing place, Iceland. Just not yet. I have been looking at different tours and of course the different types of food that the Icelander's offer. 

Being surrounded by the ocean, seafood is seen on a lot of menus. One menu item I have come across heaps on my internet travels, is dried fish. Not too sure how this would taste as we don't eat a great deal of dried fish here in Australia. I know that dried fish has been around since the Vikings and this is a way to preserve food and allowing it to last a lot longer, and less waste.


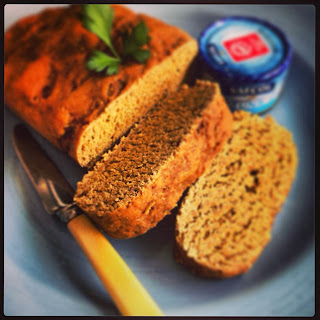
Another recipe I came across was Rúgbrauð (Rye Bread). Its my understanding that this is cooked in natural springs in Iceland. Where I live, we don't have any of them. But don't worry, a lot of websites give an alternative. 

Rúgbrauð is sweet and dense. You would think that it would be dry and doughy, but surprisingly it is very moist. I brought it straight out of the slow cooker and cut a slice, topped it with butter and it was pretty good I say. 

It would be best served right away with dried fish, butter or pate'. 

What you need:
2 1/2 cups of rye flour
1 1/2 cups of plain flour
1 tbsp baking powder
1/2 tsp salt
1/2 cup brown sugar
1 cup scalded milk, cooled until lukewarm
1 tbsp molasses

How to:
1) Mix together the dry ingredients and dissolve the molasses in the warm milk. Stir the milk into the dried ingredients and knead until the mix comes together.

2) Butter a loaf tin and put the dough in the loaf tin. Cover the loaf tin with foil and secure the foil leaving some space at the top for the dough to rise.

3) Put the loaf tin in a slow cooker and fill with water two thirds the way up the loaf tin. Simmer in a slow cooker (our version of a natural spring) on low, for four to four and a half hours. Don't let the water evaporate, check every hour or so. 

4) You can check if the Rúgbrauð is cooked the same way as a cake; put a skewer in the middle and if it comes out clean its done. If it isn't cooked through, put the Rúgbrauð back into the slow cooker for another 15 minutes.


There is a new feature on Ben's Food Blog (BFB). You can share this blog on your Facebook by clicking on the Facebook Share button located at the top of the right hand pane of this blog.

Don't forget to like BFB Facebook page for more up to date posts and more photos. BFB is also on Instagram - @bensfoodblog


Facebook page - https://www.facebook.com/pages/Bens-Food-Blog/204278519735016?ref=hl

Friday, 27 September 2013

Preserved Lemons

Preserved Lemons are widely used in Moroccan cuisine. Once they are ready to use, you wash the excess salt from the lemon and, in most instances, you use the rind of the lemon. Preserved Lemons do take about a month before you can start to use them. The brine in which they sit, allows the lemons to ferment at room temperature in a cool dark place.


I know I have been posting a lot of small condiments of Moroccan cuisine lately, but it will be worth it in the end. These past few posts are some of the basic necessities of Moroccan cooking and there are plenty more where that comes from. 

The picture featured below was taken at the same time as the Preserved Lemons were made. Once they have been sitting in their brine for about a month I will take another picture to show the difference and final product.

What you need:
10 lemons
150g coarse sea salt
2 fresh bay leaves
1 cinnamon stick
cold water

How to:
1) Squeeze the juice of 5 lemons into a bowl.

2) With a sharp knife cut a deep cross into the top of the lemons. Cut almost all the way to the bottom of the lemons. Ensure the cut lemons are still joined at the bottom.

3) Sprinkle a tablespoon of salt inside each cut lemon then push the cut lemon together and place into a sterilised jar. 

4) Once all lemons are placed into the jar, layer the remaining salt, bay leaves and cinnamon stick in between the lemons.

5) Pour the lemon juice over the lemons and fill the jar, enough to cover the lemons, with cold water.

6) Leave to ferment for a month in a cool, dark place, shaking the jar gently every 3rd day or so.


Ben's Food Blog is also on Facebook, please go to the below link, like and share the Facebook page to spread the blog out there - thank you for your support :)

Monday, 23 September 2013

Moroccan Mint Tea

The national drink of Morocco is Mint Tea. This drink is served usually before and after every meal in Morocco. It can either be enjoyed hot or cold. 

The Moroccan's don't stir the tea, the way they mix the tea is by pouring in and out of the teapot. The first glass is poured, then tipped back into the teapot to stir/mix the brew. Then from a height, the tea is poured into brightly coloured and patterned tea glasses. 


Mint tea cleanses the palette and has such a refreshing taste. 


What you need:
1 tbs Chinese gunpowder green tea
2 tbs sugar
large handful of mint leaves and stalks
boiling water

How to:
1) Put all the ingredients into a teapot and allow to brew for approx 3-5 minutes.

2) From a height pour into one glass. Then return that glass of tea to the teapot.

3) From a height pour into selected number of tea glasses. If you prefer the tea cold, allow to cool to room temperature and refrigerate before serving.


Sunday, 22 September 2013

Moroccan Dry Spice

Wow, it has been a while since I wrote my last blog, sorry all. I have been doing some experiments with some dry Moroccan spice mix. I tell you now, the smells are amazing and so are the tastes.

I have made 2 Dry Spice Mix's; Ras al Hanout (1) and Baharat (2). Both of these can be used to either marinate meat, use in Tagine and to flavor Cous Cous. To make a marinate for meat just add a little olive oil to make it wet and rub it into your meat.


Moroccan is by far my favorite cuisine. Smelling these spice mix's puts you right in the centre of Morocco's spice markets and the heart of Moroccan cuisine.

1) Ras al Hanout

What you need:
Lightly roast and finely grind -
1 tsp cumin seeds
1 tsp coriander seeds
the seeds from 6 cardamom pods
1/2 tsp fennel seeds
1/2 tsp black peppercorns 

2 tsp sweet paprika 
1 tsp ground cinnamon
1 tsp ground turmeric
1 tsp cayenne pepper
1 tsp sea salt
1/2 tsp sugar
1/2 tsp allspice 

How to:
Mix all spices together. It will keep for up to 3 months in an airtight jar.


2) Baharat

What you need:
5 tbs sweet paprika
4 tbs black pepper, finely ground
3 tbs cumin seeds, finely ground
2 tbs coriander seeds, finely ground
2 tbs cinnamon powder
2 tbs cloves, finely ground
1 tbs ground star anise
1 tsp grated nutmeg

How to:
Mix all spices together. It will keep for up to a year in an airtight jar.


Sunday, 4 August 2013

Chermoula Chicken on Cous Cous

Here it is, my first Moroccan/North African recipe. This recipe has two steps, first the wet spice mix (Chermoula) and then the chicken and cous cous. I found it better to make the spice mix a couple hours before you cook with it, this will allow the mixture to settle and the flavours to blend together.

Chermoula can either be mild or hot. You can add more chilli to this recipe to make it more hot. It goes well with seafood and poultry. Chermoula can be stored in the fridge for up to 6 months. All you have to do is add more olive oil to the top of it when you take some Chermoula out. 


What you need:
Chermoula -
2 tbs cumin seeds, lightly roasted
1 tbs coriander seeds, lightly roasted
1 1/2 tbs sweet paprika
1 tbs ground ginger
2 cloves garlic, roughly chopped
2-4 whole small red chillies, seeded, scraped and roughly chopped
juice of 2 lemons
100ml olive oil
1/2 tps sea salt
1/2 tsp freshly ground black pepper

1kg Chicken thighs
500ml chicken stock

250ml water
250g cous cous

How to:
Chermoula - 
1) Put all the ingredients into a food processor and blitz until the garlic and chillies are ground to a paste. Pour into a clean jar and cover with olive oil. 

Chicken and Cous Cous -
1) Put the chicken and chicken stock in a baking dish and put in a pre-heated oven at 180 degrees C for 15 minutes. Remove from oven and add the chermoula spice mix on top of the chicken. Bake for a further 10-15 minutes or until chicken is cooked.

2) Boil water in a pot and bring to the boil, then remove from the heat. Add the cous cous and cover for 2-3 minutes. Fluff up with a fork. 

3) Put the cous cous on a large dish topped with the cooked chermoula chicken. Pour the remaining stock/sauce from the bottom of the baking dish over the chicken and cous cous.


Facebook and Instagram

We are now on Facebook and Instagram, please help me out by going to both, like and share so I can get this blog out there :) thanks for all of your support

Facebook - https://www.facebook.com/pages/Bens-Food-Blog/204278519735016

Instagram - @bensfoodblog

Saturday, 3 August 2013

Moroccan - My Favourite Cuisine

There are so many different types of cuisines around the world, but my all time favourite is Moroccan. I can remember the first cook book that I had was a Moroccan cook book. I still have that book to this day.

The mix of Roman, Arabic and Spanish from the more recent times and from the Byzantines, Phoenicians and Carthaginians in the ancient times, these civilisations make up what is now a cuisine of its very own, Moroccan.

Not only is the food full of flavour but the cooking utensils used to create these beautiful dishes are one of a kind. A tagine is terracotta heavy based saucepan with a funnel looking lid. I personally don't know exactly what makes the difference between a tagine and a regular saucepan, but the taste is so different when cooked in a tagine. And there is nothing that can beat an authentic meal right down to the pot it is cooked in.

I haven't posted a Moroccan recipe on my new blog yet as there is so many to choose from and they are all so good. If you have any suggestions of a Moroccan dish that you would like to see, please leave it in the comments below this post.


If you are into spices then Moroccan food is definitely for you. 

I had booked a trip to Morocco last year and was told a couple months before the trip that the tour that I had planned had been cancelled as there was not enough people who booked to go on the tour. I am definitely going to go to Morocco in the future, especially to taste the food.

Morocco's national drink would have to be mint tea. The mixture of Gunpowder green tea and spearmint will provide a refreshing taste and cleanse the pallet. Mint tea is drank any time of the day and drank anywhere. Mint tea is never stirred but poured into the glass from a hight. The first poured glass is then poured back into the tea pot to mix the brew. Then the tea is poured into a Moroccan tea glass from a height.

I will be posting something Moroccan very soon, this post is just a preview of some of the awesome food that Moroccan's can offer.

Spiced Rice

You can't go past a good curry, especially when the weather is raining and cold like it is here tonight. What does everyone usually have with their curry? Rice? Why not spice your rice up a bit and make it shine. 

We don't eat plain rice with our curries any more, we eat Spiced Rice. This is another quick and easy recipe that you only need the one pot for. Our cupboard is full of a wide range of spices. When spices are added to something plain, like rice, it makes your taste buds dance. 

The spices used in this recipe all have a very strong flavour and when you smell them, it reminds me of a Christmas lunch mixed with a licorice shop.
This recipe requires two bay leaves. I personally find fresh bay leaves have a lot more flavour in them than the dried leaves. It can sometimes be hard to find fresh bay leaves around, so why not plant a grow a bay tree? We have done just that. I have bought mum her very own bay tree and in the past three years she has had it, it has tripled in size. Yes it may only be about 30cm tall and has a way to go before becoming a large tree, but it has so many usable leaves on it already.

Serves 4-6

What you need:
225g basmati rice
30g ghee OR butter
5 green cardamom pods, bruised
5 cloves
1/2 cinnamon stick
1 tsp fennel seeds
1/2 tsp black mustard seeds
2 bay leaves
450ml water
salt and pepper to taste

How to:
1) Melt the ghee in a large saucepan with a tight-fitting lid over a medium-high heat. Add the spices and bay leaves and stir for 30 seconds. Stir the rice into the ghee and spices so the grains are coated with ghee. Stir in the water, salt and pepper and bring to the boil.

2) Reduce the heat to as low as possible and cover the saucepan with the lid. Simmer, without lifting the lid, for 8-10 minutes, until the grains are tender and all the liquid is absorbed. 

3) Turn off the heat and use 2 forks to fluff up the rice. Re-cover the saucepan and leave to stand for 5 minutes


Saturday, 20 July 2013

Paella done on the Barbecue

Paella is one of those dishes that you can have on cold winter's night to warm the soul or on a hot summer's night with friends/family. No matter what time of year, there is always time for Paella. You can cook Paella in most large heavy based saucepans, but the best and traditional way is done in a Paella pan.

Paella pans can range from small to extremely large. The one shown on the right is a 40cm diameter Paella pan. Obviously the bigger the pan, the bigger the cooker you need. You want to make sure the pan is heated evenly, otherwise the whole Paella wont be cooked. I don't have a big enough cook top or gas burner to cover the whole pan. I used our barbecue as the cook top and it worked perfectly.

Paella is more or less a seafood risotto. You can use basically any seafood for a Paella, just remember to use fish that are local and sustainable. A great website for sustainable seafood within Australia is - http://www.sustainableseafood.org.au This website lists available Australian seafood and the impact it has on the environment and the impact on the fish. Choose seafood that is sustainable and say no to overfishing, destructive fishing gear and poor aquaculture practices.

Paella is great party food, granted it takes time to prepare and cook, but the end result is well worth it. Paella is best served outdoors with a beer in hand with friends/family.

Serves 4-6

What you need:
125ml white wine
2 red onions, finely chopped
12-16 mussels, de-bearded and scrubbed
125ml olive oil
1 rasher bacon, finely chopped
4 cloves of garlic
1 red capsicum, seeded and finely chopped
1 tomato, peeled and chopped
90g chorizo, thinly sliced
pinch cayenne pepper
225g paella or short-grain rice
500ml chicken stock
85g peas
12 prawns, peeled and de-veined, tails left intact
2 squid tubes, cut into rings
115g white fish fillets, skinned and cut into pieces
2 tbsp flat leaf parsley, finely chopped

How to:
1) Heat wine and two-thirds of the onion in a saucepan. Add the mussels, cover and gently shake the pan for 5 minutes over high heat. Remove from the heat, discard any mussels that did not open and drain, reserving the liquid. Heat the oil in a large heavy based frying pan (or Paella pan), add the remaining onion, bacon, garlic and capsicum, and cook for 5 minutes. Add the tomato, chorizo and cayenne pepper. Season with salt and pepper. Stir in the reserved liquid, then add the rice and stir again.

2) Stir stock into the rice mixture. Bring to the boil, then reduce the heat to low and gently simmer, uncovered for 15 minutes without stirring.

3) Put the peas, prawns, squid and fish on top of the rice. Push them in, cover and cook over low heat for 10 minutes, turning the seafood over halfway through cooking time, until the rice is tender and the seafood is cooked through. Add the mussels for the last 5 minutes to heat through. If the rice is not quite cooked, add extra stock and cook for a few more minutes. Allow to rest for 5 minutes. Sprinkle with parsley and serve.


Saturday, 13 July 2013

Chilli Caramel Sauce

I don't mind chillies at all. I don't like those hot dishes that are so hot, it is so unbearable to eat. Just a couple little facts about the glorious chilli. Many people believe that it is the seeds in the chilli that make it hot. Sorry to burst your bubble but they aren't the part of the chilli which makes it hot.

What gives chillies their heat is a chemical called Capsaicin. It is found primarily in the membrane of the chilli. The common misconception that the seeds are the hottest part is due to the membrane being more prominent around the seed.

The heat of a chilli is measured in Scoville Heat Units (SHU). Just to give you an idea, an ordinary regular Capsicum is 0 SHU, a Jalapeño is between 3500 - 8000 SHU and the small Thai chilli (photo to the right - home grown) is between 50,000 - 100,000 SHU. HOT!

There is so many ways to use chillies. I have made home made hot sauce, yes with the Thai chillies. It is made from garlic, vinegar salt and chillies - very simple, very hot. You only need a couple drops to make a meal turn hot. Today I made a Chilli Caramel Sauce. Sweet, sticky, citrus and a mild hint of heat! I saw it on Masterchef's master-class and thought I would give it a go. My version is slightly different and not as hot.

It goes well with chicken, white fish and crustaceans. It would also be a nice side sauce to a bit of steak. Another simple easy recipe to follow.


Makes approx 250ml

What you need:
250g palm sugar
4 long red chillies, finely chopped
Juice of 1 lime
1/4 cup of water

How to:
1) Place sugar and water into a small saucepan over medium-high heat. Cook for about 7-8 minutes or until golden and sticky. Add lime juice and chilli, stir to combine. Put sauce in a glass jar and allow to cool before placing lid on jar.


Thursday, 11 July 2013

Tabouli with Quinoa

This year our flat leaf parsley has just gone wild! Even now that it is winter and the frosts are covering the ground, they are still growing really well. Flat Leaf Parsley is a source of antioxidants, folic acid, vitamin K, vitamin C, and vitamin A. 

Not only is Parsley a great decoration for the plate, but there is so many different ways to use it. You can use it as a sauce, in salad or even in savoury muffins. At home we have so much of the stuff, I decided to make Tabouli (Lebanese Parsley Salad). It is easy and very quick to make. Instead of putting burghul in it, I substitute this with the ancient grain, Quinoa.

Quinoa was first used around 3000 years ago by the Andean people in South America. It is also known by many people as a Superfood with a good source of dietary fibre and phosphorus. Quinoa is also high in magnesium and iron. For those who are lactose intolerant, Quinoa is a source of calcium. 


With this simple Tabouli recipe, you are getting a great source of your daily dietary needs and its very tasty! You can also use this Tabouli recipe in burgers instead of the lettuce. So many ways to use it, just let your mind run crazy!!!


Serves 8

What you need:
1/3 cup Quinoa
2/3 cup water
2 large tomatoes, finely chopped
1/4 lemon juice
4 cups chopped fresh flat leaf parsley
1 cup chopped fresh mint leaves
3 spring onions, thinly sliced
1/4 cup olive oil

How to:
1) Boil water in a small saucepan. When boiling add Quinoa, turn heat down to low and simmer for 10 minutes. Drain Quinoa and allow to cool.

2) Add all ingredients into a large mixing bowl and mix until well combined. Serve. EASY!

Tuesday, 9 July 2013

Home Made Pasta

Pasta is pretty good when bought from the shop, but have you ever tried home made pasta? Once you try it, you will never buy pasta from the shop again. The first time I tried to make home made pasta, I used a rolling pin. Good job to those Italian mamma's for doing it from dawn to dusk with nothing but their hands and muscles!

An essential tool for home made pasta is definitely a pasta machine. From here, depending on what type of pasta machine you buy, you can get attachments and accessories for all kinds of pasta. I cook a lot of fettuccine. Most pasta machines come standard with a fettuccine cutter. If you don't have any attachments, don't worry. You can still make lasagne and handkerchief pasta. You can also use an every day-to-day sharp knife to cut ribbon pasta or uneven fettuccine.

A basic rule to remember is 100g of plain flour to 1 egg and a pinch of salt. This ratio will feed one person. You can always add more flour if the dough is too wet or sticky. Even better, you can always add colour and flavour. For mother's day one year, my nephew and myself made pink pasta just for nanny. Just add a couple drop of food dye to the pasta mixture to make colourful pasta. This is awesome fun with kids.

For more grown up flavoured pasta, you can add, but not limited to, spinach (blended until purée), beetroot juice or even squid/cuttlefish ink. Squid/cuttlefish ink can be expensive. It has a faint taste of squid but not too overpowering. Basically any flavour you can think of, you can add to pasta. Just a tip, if you add more liquid, add a little bit more flour. The pasta will be over sticky and become a pain to get to that silky smooth texture of home made pasta if you don't add that extra flour.

Home made pasta doesn't triple in size like bought pasta and takes about a quarter of the time to cook. So cook it at the last minute. Don't forget, the pasta is the star of a pasta dish so don't overload it with the sauce. I have been told in the past to never put oil in the water while cooking pasta. I found that my pasta stuck together in large clumps. I was watching Masterchef one night and an Italian cook, who has been cooking for over 50 years, put olive oil in his water. I haven't looked back. I will always now put a glug of olive oil in my boiling water to help preventing the pasta sticking. When you drain your pasta, you then toss the pasta in the saucepan with the sauce and serve right away. YUM!

Serves 1 person - times the recipe by the number of people

What you need:
100g Plain Flour
1 Egg
Pinch of Salt
Water and Olive Oil - for cooking

How to:
1) Place flour and salt in a large mixing bowl. Make a well in the middle of the flour and crack the egg in the middle.

2) Mix ingredients together with a wooden spoon until the mixture comes together.

3) On a floured service, need the dough until it comes together in a smooth ball. If the mixture is too wet and sticky, add more flour to compensate.

4) Once the dough is in a smooth ball, wrap in plastic and set aside for about 30 minutes (I personally don't refrigerate it as it becomes hard to roll out).

5) Once rested, follow the instructions on your pasta machine to make amazing pasta.

6) Boil a large pot of water with a glug of olive oil. Slowly add your uncooked pasta and cook for about 2-3 minutes. Strain, add to sauce and serve.

Monday, 8 July 2013

Orange Blossom Turkish Delight

I love Turkish Delight, so I thought I would try and cook some myself. When I think Turkish Delight, I think of glucose syrup, which is used in a lot of lolly recipes. But no, there was no pure glucose syrup in this Turkish Delight. 

There aren't too many ingredients in Turkish Delight, but the time it takes to cook is long. Make sure you have a whole week end to do this. I also thought it would be a pain to wash all of the gear when finished. Surprisingly  with a little hot water makes life real easy. The flavour and reward of accomplishment when the final product presents its self is amazing. This sticky, sweet, melt in your mouth little square is surely a delight, Turkish Delight.


Serves 50 little squares

What you need:
1kg granulated sugar
1.1 litres cold water
1 tsp lemon juice
150g cornflour
1 tsp cream of tartar
2 tbsp orange blossom water red and yellow food colouring (mix to make orange)
sunflower oil, for brushing
85g icing sugar

How to:
1) Place the sugar, 375ml of the water and the lemon juice in a large, heavy-based saucepan over low heat. Stir until the sugar dissolves, bring to the boil and boil until the mixture reaches 115 degrees C on a sugar thermometer. Remove the pan from the heat.

2) Blend 115g of the cornflour, the cream of tartar and 250ml of the water in a large heatproof bowl until smooth. Bring the remaining water to the boil in a large, heavy-based saucepan and stir it into the cornflour mixture in the bowl. Return the mixture to the pan, place over medium heat and cook, whisking constantly with a balloon whisk, until the mixture thickens and bubbles.

3) Gradually add the hot syrup, stirring constantly. Bring to the boil and boil gently, stirring regularly with a wooden spoon, for about 1.5 hours, or until the mixture is pale golden. Stir in the orange blossom and enough orange food colouring to tint the mixture pale orange. Pour into a 23cm square cake pan lightly brushed with oil and set aside for 12 hours.

4) Combine the icing sugar and the remaining cornflour in a shallow dish. Cut the Turkish Delight into approx 2.5cm squares using an oiled knife and toss in the sugar mixture. Store in a sealed container with the remaining sugar mixture sprinkled over.

Welcome to my food blog

Hello,

Welcome to my food blog. I am not a professional chef but I love to cook. I will try to cook anything. Please feel free to browse my blog and check out what I have been up to in the kitchen.


Ben